
Accuracy, 360° & difficult faces
At a glance
Detection finds the region; the chosen effect hides it. Model, confidence, target, and padding solve different problems. Increasing blur strength does not improve detection.
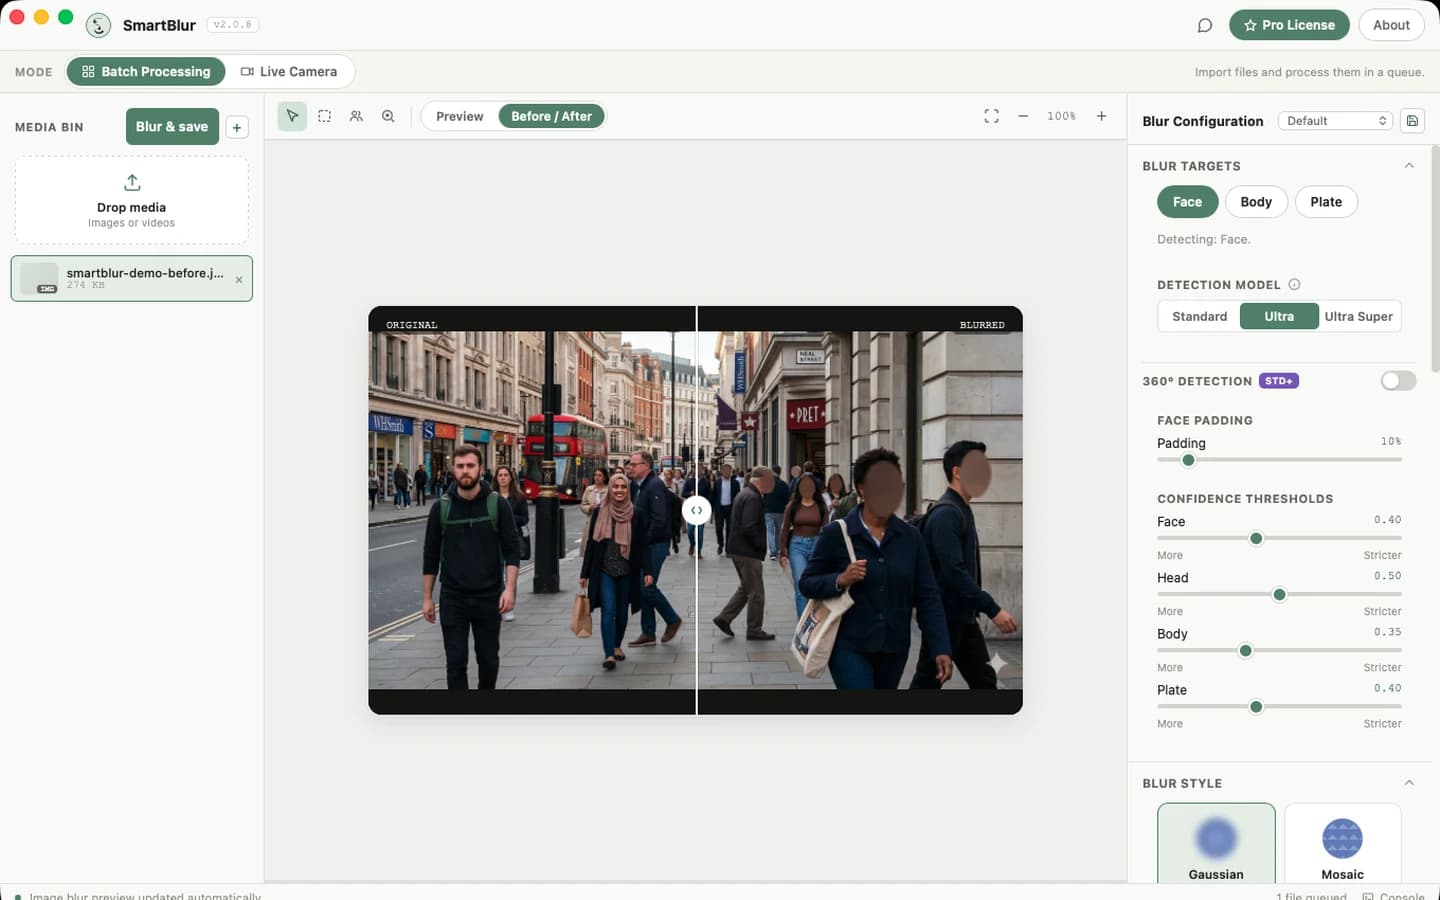
Step by step
- 01
Enable only the targets you need. Add Body when someone turns away or their face is not visible. Plate detection requires Pro.
- 02
For small, angled, or partly hidden faces, test Ultra on Standard or Pro; Pro also offers Ultra Super. More demanding models can take longer.
- 03
Use 360° for rotated faces or unusually oriented footage. Lower a target’s confidence slightly to reduce misses; raise it to reduce false detections.
- 04
Once the target is detected, increase padding if coverage is tight. Test several difficult frames and save settings only after reviewing their tradeoffs.
Before you share
360° is not a guarantee of finding every face from every side. Padding cannot recover a missed detection. Review half faces, distant people, and motion frame by frame where needed.
Full desktop guide (English)
AI Detection and Accuracy Tuning
Accuracy comes from four separate decisions: what to detect, which model to use, how confident a detection must be, and how much area to cover around it.
Detection targets
| Control | Use it for | Notes |
|---|---|---|
| Face | Faces and head privacy | Best default for portraits, meetings, and most public footage. |
| Body | People when faces are hidden, tiny, turned away, or not the only identifying feature | More work per frame. Body selection also uses the Head and Body thresholds internally. |
| Plate (Pro) | Vehicle license plates | Pro is required. Enable it only for footage containing vehicles or when policy requires it. Plates remain blurred by default and cannot receive a keep-visible identity rule. |
A threshold only affects its associated enabled target. For example, moving Plate confidence does nothing visible while the Pro-only Plate target is off.
Choose a model
| Model | Plan availability | Best for | Tradeoff |
|---|---|---|---|
| Standard | Free, Standard, and Pro | Clear, front-facing, well-lit, larger subjects | Fastest option, but more likely to miss difficult small or angled subjects. |
| Ultra | Standard and Pro | CCTV, moving subjects, moderate crowds, more difficult angles | Slower than Standard; test it against representative scenes. |
| Ultra Super | Pro | Dense crowds and distant or occluded subjects | Slowest and heaviest option; it can improve difficult-scene coverage but does not guarantee every detection. |
Changing the model does not change blur strength; it changes the detector. Local webcam processing is available on Standard and Pro; RTSP processing requires Pro. During a licensed live session, SmartBlur shows a loading/applying status and continues the same source session while a newly selected model loads.
Confidence thresholds
Confidence is a value from 0.00 to 1.00.
- Move left toward More to accept weaker detections. This reduces misses but can blur ordinary objects.
- Move right toward Stricter to require stronger evidence. This reduces false positives but can miss difficult subjects.
- Tune only the target that has the problem, in steps of roughly 0.05.
Practical examples
| What you see | First adjustment | If that is not enough |
|---|---|---|
| A distant face is repeatedly missed | Lower Face by 0.05 | On Standard or Pro, change Standard → Ultra, then consider 360° |
| A poster or object is blurred as a face | Raise Face by 0.05 | Check another model or disable Face if not required |
| A person facing away is missed | Enable Body and lower Body slightly | Use Ultra on Standard/Pro, or test Ultra Super on Pro |
| Plates are missed at distance | On Pro, enable Plate and lower Plate slightly | Test the Pro-only Street Footage/Ultra Super setup and a clearer source stream |
| Too many body-shaped objects are blurred | Raise Body | Disable Body when face-only privacy is sufficient |
Do not set every threshold extremely low “for safety.” That often produces large amounts of irrelevant blur and makes review harder. Test representative scenes and choose the lowest value that gives reliable coverage with tolerable false positives.
Face padding
Padding expands the blur region after a face is detected.
- 0–10%: precise coverage for stable, close, front-facing faces.
- 10–20%: useful general range and a good video starting point.
- 20–35%: moving subjects, loose detection boxes, hair/ears/head edge coverage.
- Above 35%: strong privacy margin, but it can hide nearby context or merge neighboring blur regions.
Padding cannot recover a subject that was never detected. If there is no blur at all, tune confidence/model/target first. If there is a blur but it is too tight, increase padding.
360° Detection
360° Detection is available on Standard and Pro. Enable it when the image orientation or subject angle is unusual: rotated phones, overhead cameras, sideways footage, people leaning, or cameras mounted at an angle. It adds detection work and, in Pro live mode, can reduce frame rate. Leave it off for conventional upright footage unless testing shows a benefit.
Blur style and intensity are different
Detection finds a region. Blur rendering hides it.
| Style | Use | Important behavior |
|---|---|---|
| Gaussian | Natural soft redaction | Increase intensity until details cannot be recovered visually. |
| Mosaic | Obvious pixelated redaction | Strong and easy to audit; avoid blocks that are too fine. |
| Solid Shape | Maximum visual concealment | Hides all visual detail inside the region. |
| Overlay Image | A replacement graphic where configured | Verify the overlay exists and covers the entire region. |
Intensity does not improve detection. Always review the boxes/coverage separately from the visual strength.
A repeatable tuning procedure
- Use the relevant built-in preset.
- Test representative files or 20–30 seconds of the real camera scene.
- Mark every miss and false positive by target.
- Adjust one target threshold by 0.05.
- If misses remain, move up to Ultra on Standard/Pro or Ultra Super on Pro, then retest.
- On Standard or Pro, enable 360° only for angle/orientation problems.
- Increase padding only after detection is reliable.
- Review multiple video timestamps and scene changes.
- Save the result as a custom preset once it is stable.
Standard and Pro include local webcam processing; Pro also includes RTSP processing and live recording. For timing and reconnection behavior, see Webcam & RTSP.