
SmartBlur v2 Desktop Workspace
Find the current Windows and Mac website releases on the download page. The interface screenshots in this guide show the same core SmartBlur 2 workspace on macOS, which is also available on supported Windows PCs. Every plan has Batch Processing for files. Live Camera supports a local webcam on Standard and Pro on both platforms. RTSP/RTSPS input and processed live recording require Pro. SmartBlur Camera output works in supported Windows and macOS website builds; the Microsoft Store package does not include it.
Single-frame video preview and Edge Feather are included in macOS 2.1.2. The Windows 2.1.0 build predates them; their implementation is shared across platforms, so use a Windows release whose Release Notes list these features.
Free processes video files up to 10 MB. Standard and Pro have no video-size limit. The Standard detector is available on all plans; Ultra and 360° Detection require Standard or Pro, while Plate and Ultra Super require Pro.
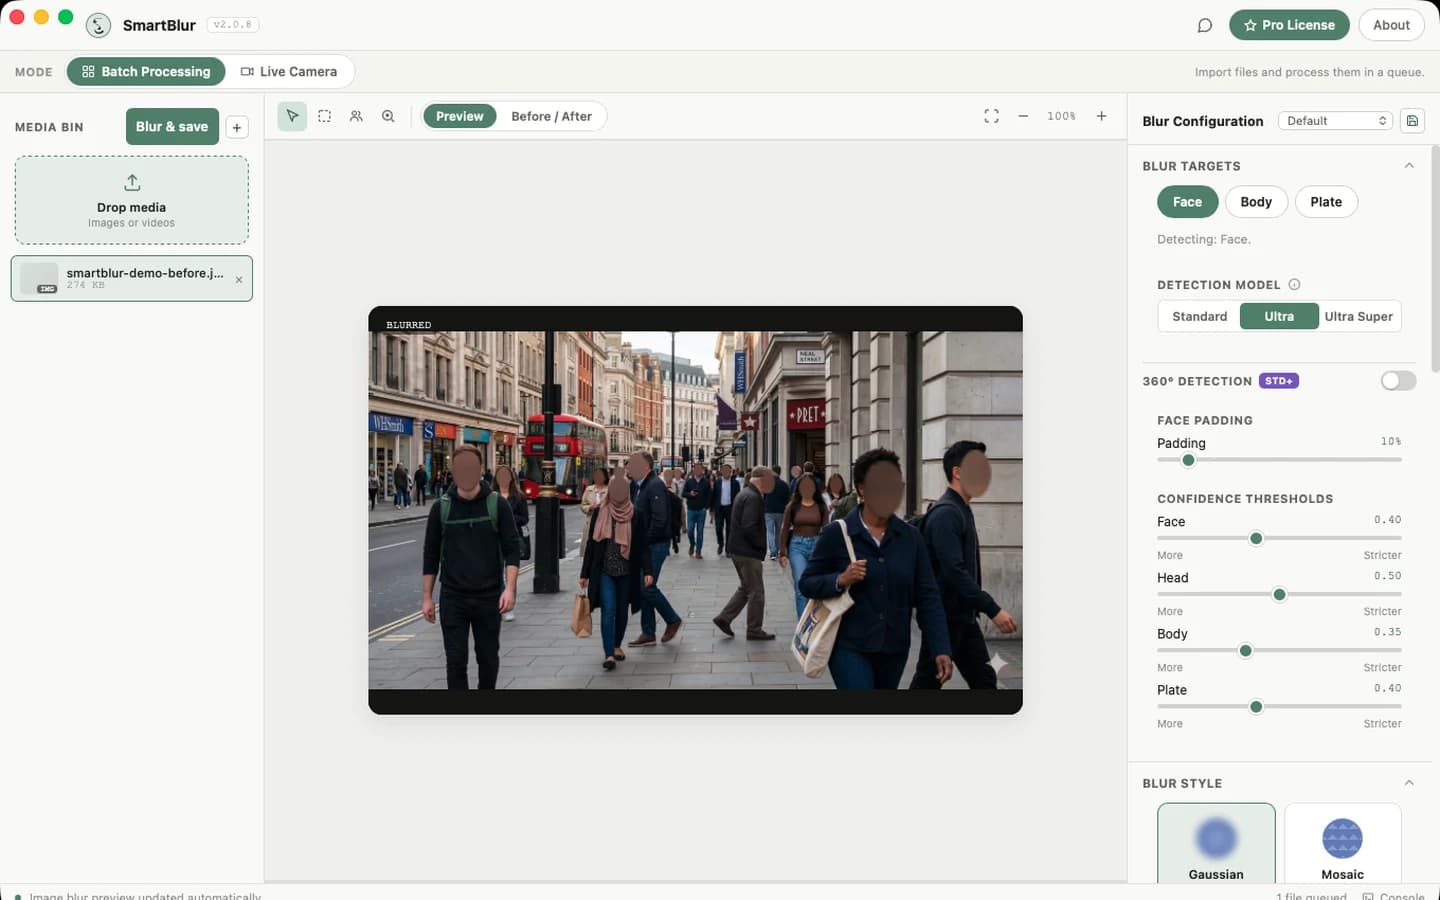
What each area does
| Area | Purpose | What to expect |
|---|---|---|
| Mode | Switches between Batch Processing and licensed Live Camera | Your processing settings stay available when you switch modes. |
| Media Bin / Live Source | Adds files or configures a licensed live source | Files appear in a queue; Standard and Pro can use a webcam, while RTSP requires Pro. |
| Monitor | Shows the selected source and processed result | Images auto-preview; videos provide playback plus a button to process the frame at the playhead; licensed live mode shows incoming processed frames. |
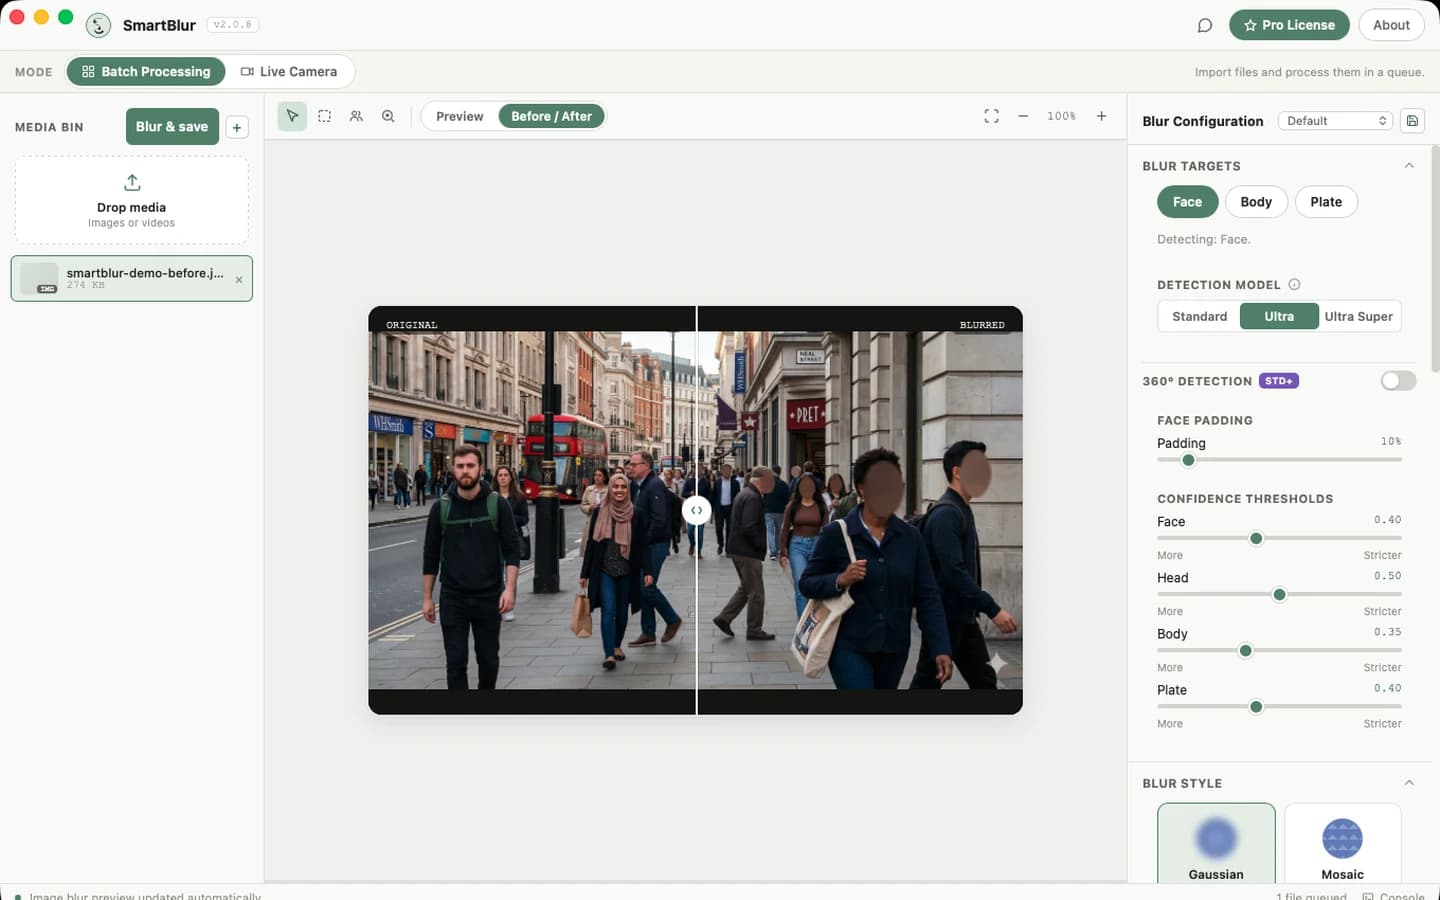
| Preview / Before & After | Reviews the result | Preview shows the processed output. Before & After helps confirm coverage before export. |
| Blur Configuration | Controls targets, model, confidence, padding, style, intensity, Edge Feather, selective blur, and output | Available controls follow the active plan. File-image and licensed live changes apply to the corresponding preview. |
| Status bar / Console | Reports model readiness, processing, saves, and failures | Read this first if the result does not change or a source will not connect. |
A safe file workflow
- Stay in Batch Processing.
- Click Drop media, the + button, or drag images/videos into the Media Bin.
- Select a file in the queue. A still image is automatically processed for preview.
- Choose Face and/or Body. Pro also provides the Plate target.
- Review the result at several zoom levels. For video, move the playhead and click Single-frame preview at several timestamps and scene changes.
- Adjust thresholds, padding, blur style, intensity, and Edge Feather if needed. Changing a video setting clears the old frame result; click Single-frame preview again. Standard and Pro can use Ultra and 360° Detection; Ultra Super requires Pro.
- Use Before & After to check that private regions are covered. A single video frame is an approximation without full-video temporal tracking.
- Set Output options, then click Blur & save for the queued files.
- Open or reveal the saved output and inspect it before sharing. SmartBlur never replaces the source file unless you explicitly choose a conflicting destination.
Presets
The preset menu at the top of Blur Configuration changes several controls together.
| Preset | Starting point | Typical behavior |
|---|---|---|
| Default | General photos and videos | Face target, Standard model, Gaussian blur, 10% padding. |
| Street Footage | Pro starting point for crowds, traffic, and distant subjects | Face, body, and plate targets; Ultra Super; 360° detection; more padding; stronger mosaic. Its full configuration requires Pro and is the slowest built-in preset. |
| Office CCTV | Standard/Pro starting point for fixed indoor cameras | Face and body targets; Ultra; moderate Gaussian blur and balanced thresholds. |
After tuning the controls, use the save icon beside the preset menu to name a custom preset. Custom presets are stored in the local device profile. A preset is a starting point—always review the actual footage.
On a clean first install or fresh app profile, SmartBlur starts with Default, so 360° Detection is off. A Pro trial unlocks the control without turning it on. Street Footage turns it on; Default and Office CCTV turn it off. Existing profiles restore the last saved settings.
Single-frame preview and Edge Feather
For a selected local video, Single-frame preview appears in the transport bar to the right of the time display. Move the playhead, click the button, and inspect the source and processed frame in Before & After. It previews one frame without exporting the video and does not use full-video temporal tracking. Blur & save performs the complete export with temporal tracking.
Edge Feather is in Blur Configuration → Blur Style, directly below Intensity. It ranges from 0–40% and defaults to 8%. It softens only the transition outside the fully protected core and applies to Gaussian, Mosaic, and Solid Shape. Overlay Image keeps its own alpha edge, so the control is disabled for that style.
Changes that happen automatically
Still images
Changing an available target, model, 360°, padding, confidence, blur style, or intensity schedules a new preview for the selected image. Ultra and 360° require Standard or Pro; Plate and Ultra Super require Pro. Wait for the status bar to confirm that the preview was updated. A model change can take longer because the new model must load.
Videos
The controls determine the next preview/processing request. Changing a setting invalidates the displayed frame result. Move to the desired timestamp and click Single-frame preview again, then review more than one frame before starting a long export; movement, distance, lighting, and motion blur can change detection quality.
Webcam (Standard and Pro) and RTSP (Pro)
Licensed live processing groups rapid control changes for about 400 ms, sends the latest configuration to the existing session, and processes following frames with it. The source connection stays open. A model change may produce a brief loading pause; ordinary changes such as target, confidence, padding, 360°, style, intensity, and Edge Feather normally appear on subsequent processed frames. See Webcam & RTSP.
Manual and identity controls
Manual blur regions are fixed rectangles or ellipses at image/clip coordinates; they do not track a moving subject. Standard supports manual face decisions for one image at a time. Pro adds probabilistic face/body identity matching across image, video, batch, and live workflows.
Privacy review checklist
- Check the whole frame, including edges, reflections, screens, windows, and background people.
- For videos and Pro live recordings, inspect the beginning, middle, end, and any scene change.
- Lower confidence or use a stronger model when small or obstructed people are missed.
- Increase padding when hair, ears, head edges, or motion extend outside the blur.
- On Pro, enable Plate only when vehicle plates need protection.
- Keep the original private source and processed output in access-controlled folders.
- Do not publish a result until a human review confirms the required subjects remain covered.
Where to go next
- Quick Start for a short first-photo workflow
- AI Detection for model, confidence, 360°, and padding decisions
- Webcam & RTSP for Standard webcam, Pro RTSP/recording, and immediate settings behavior
- Troubleshooting when a source, model, or output does not behave as expected