
Processing Settings Reference
The right-side Blur Configuration panel is the source of truth for file processing and licensed live processing. Standard and Pro support local webcams on supported Windows and Mac devices; RTSP and processed live recording require Pro. Settings persist in the local device profile and are included in built-in or custom presets.
Release availability: Single-frame preview and Edge Feather are included in the current macOS 2.1.2 release. The current public Windows 2.1.0 build predates them; on Windows, use a release whose Release Notes list these features.
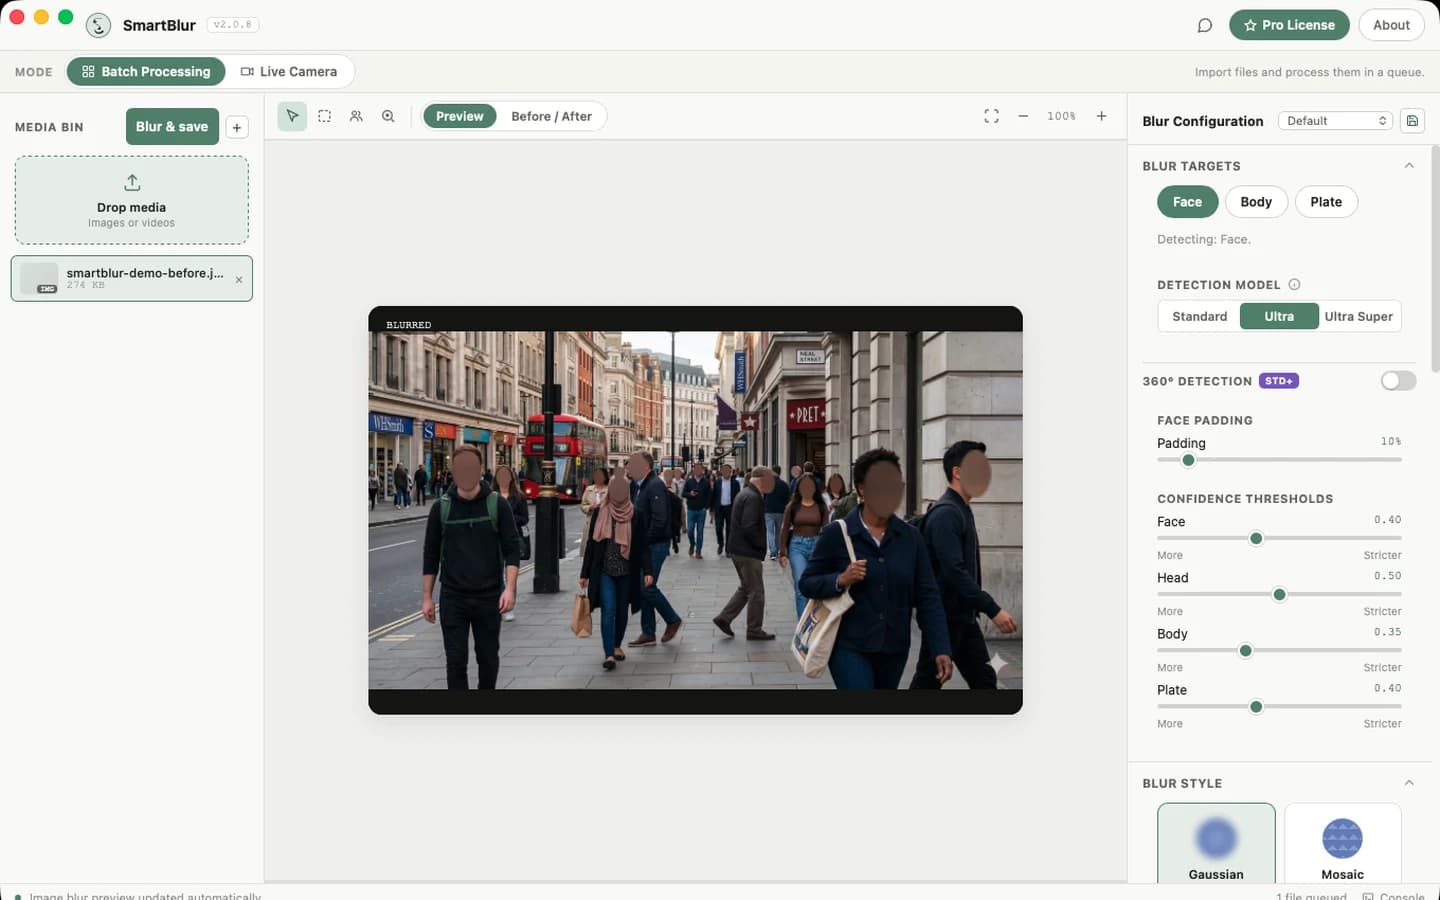
Detection
| Setting | Values | Effect |
|---|---|---|
| Targets | Face, Body; Plate on Pro | Selects the subject types to detect and redact. Plate detection requires Pro. |
| Detection Model | Standard on all plans; Ultra on Standard/Pro; Ultra Super on Pro | Trades processing speed for potential difficult-scene coverage. Every result still requires review. |
| 360° Detection | On/Off on Standard and Pro; off on a clean first install | Adds rotated/angled detection work and can reduce throughput. It is not available on Free. |
| Face Padding | 0–100% in the UI | Expands detected face regions. The processor caps the effective enterprise-mapped padding at a safe maximum. |
| Face Confidence | 0.00–1.00 | Lower accepts more possible faces; higher is stricter. |
| Head Confidence | 0.00–1.00 | Used for head/person detection paths. |
| Body Confidence | 0.00–1.00 | Controls body detections. |
| Plate Confidence | 0.00–1.00 on Pro | Controls detections from the Pro-only Plate target. |
See AI Detection for a decision guide.
Blur style
| Setting | Values | Effect |
|---|---|---|
| Style | Gaussian, Mosaic, Solid Shape, Overlay Image | Changes rendering inside each detected/manual region. |
| Intensity | 0–100% | Changes blur/pixel strength where the chosen style uses intensity. |
| Edge Feather | 0–40%; default 8% | Softens Gaussian, Mosaic, and Solid Shape boundaries outside the protected region while keeping the protected core fully redacted. It is disabled for Overlay Image. |
| Draw Bounding Boxes | On/Off | Adds diagnostic boxes. Leave off for production output unless you intentionally need them. |
| Latency Logging | On/Off | Records processing timing for diagnostics. It does not improve performance. |
Selective blur
Standard supports manually assigning face decisions with Review people in preview when one image is loaded. It does not perform identity matching, and it is not available for a video, batch, or live source.
Pro adds probabilistic face/body identity matching across image, video, batch, and live workflows, including known-person references from the Staff Gallery. Rules such as Keep Visible or Blur Staff still require full output review; recognition uncertainty must not silently expose a person.
License plates remain privacy-safe and cannot be assigned a keep-visible identity rule.
Manual blur regions
Manual regions are rectangles or ellipses fixed to image/clip coordinates. You can drag, resize, reshape, or delete them, but they do not track a moving person or object across video frames.
Output
The Output section controls the destination folder, filename prefix/suffix, quality, metadata stripping, and whether already processed inputs are skipped. Important operating rules:
- Free accepts video files up to 10 MB; Standard and Pro have no video-size limit.
- Use a separate output folder for important jobs.
- Keep metadata stripping enabled when location/device EXIF is not needed.
- A filename suffix such as
_blurredmakes source and processed files easy to distinguish. - Skip already processed is useful for repeatable batches, but verify its filename rule matches your workflow.
- Open/reveal and review a saved output before distributing it.
Presets and persistence
| Preset | Main configuration |
|---|---|
| Default | Face, Standard, confidence 0.40, Gaussian 50%, padding 10%, Edge Feather 8%, 360° off |
| Street Footage | Pro: Face + Body + Plate, Ultra Super, lower thresholds, 360° on, Mosaic 70%, padding 18%, Edge Feather 6% |
| Office CCTV | Standard/Pro: Face + Body, Ultra, moderate thresholds, Gaussian 55%, padding 12%, Edge Feather 10%, 360° off |
Selecting a preset immediately applies all its available settings. The save button creates a named custom preset from the current controls. If you change a control after selecting a built-in preset, the current file job or Pro live job uses the new value; save a custom preset if you want that combination again.
On a clean first install or fresh local profile, SmartBlur starts with the Default preset, so 360° Detection is off. A website build's automatic Pro trial unlocks the control but does not turn it on. Processing settings persist locally after they are changed, so an existing profile restores its saved value. Selecting Street Footage turns 360° Detection on; Default and Office CCTV turn it off. A reinstall can retain the previous value when the operating system preserves the app profile.
When settings take effect
| Context | Timing |
|---|---|
| Selected still image | A new automatic preview is scheduled after the control change. |
| Queued batch | The current settings snapshot is used when processing is started. |
| Selected video | Changing a processing setting clears any existing single-frame result. Move to the desired playhead position and click Single-frame preview again. Blur & save uses the current settings with full-video temporal tracking. |
| Running webcam (Standard/Pro) or RTSP (Pro) | Changes, including Edge Feather, are grouped for about 400 ms and applied to subsequent frames. Model changes briefly load the new model without reconnecting the source. |
Restore a known baseline
Choose Default from the preset menu. Then verify targets, output folder, and metadata choice because those items can affect privacy and file handling even when visual controls look correct.